dimarts, 31 d’octubre del 2023

 Kawasaki z900rs usb plug and Garmin 17mm ball mount


Tenir un GPS a la moto ajuda bastant a anar pels llocs.
La Kawasaki Z900rs  porta un connector de 12V sota el seient, però no porta cal connector USB. Es pot comprar com accessori, substituïnt el connector de 12V, però continua sota el seient.
En posarem un a la zona dels comptadors.

Trobareu múltiples llocs on aconseguir un conversor de 12V a USB (5V) per a connectar GPS. Tancadets i termosoldats en una capseta per automoció.

El problema és connectar-los a 12V sense tallar fils i connectar-ho al lloc adequat.

Farem un cable "splitter" per el connector de 12V de sota el seient, de manera que no haurem de tallar res.

La única part complicada és trobar els connectors adequats, que son els SUMITOMO HM090

GPS in the motorcycle is a nice to have accessory.
Kawa Z900rs has a 12V cigarrette lighter plug under the seat. A USB plug can be purchased from KAwasaki, but you'll lose the 12V plug. And after all, it will continue to be under the seat.
Let's install a USB plug in the counter area. 

There are lots of DC to DC converters 12V to 5V with USB for automotive applications out there. 

The probem is getting 12V without having to mess the bike wiring.

Let's make a splitter cable, that can get 12V from the cigarette-lighter plug under the seat.

The only complicated thing is getting the propper connector, that is the SUMITOMO HM090

SUMITOMO HM090 Kawasaki z900rs accessoty plug


He trobat algun lloc que deia que el connector adequat era el Sumitomo MT090. Compte que s'assembla molt però no ho és.

I've read somewhere that the plug is a Sumitomo MT090. Beware it is not.


Sumitomo MT090 (left) and HM090 (right)


Ok, fabrico un splitter, un cable curt per connectar el connector de 12V, i un cable llarg per a connectar el convertidor DC DC de 12V a 5V.OK, there's the splitter I built. One short wire to connnect the original cigarette lighter, and a longer wire to connect the DC-DC converter 12 to 5V


Splitter cable.


Splitter cable, DC converter and original 12V cigarette plug.


Enrutar el cable per la moto te la dificultat habitual.

Anar subjectant amb brides ajudarà a que no caigui.

Routing the cable through the bike is tricky, but can be done easily..

Tie it with ties to prevent cable from getting loose.


USB connector near the clocks.

My beloved Garmin in place.

The mount is a 17mm stainless steel ball.


cosa

divendres, 6 d’octubre del 2023

Silencing HP Proliant ML110G7 for good. 2 ways


Silenciant els ventiladors del HP Proliant ML110G7 d'una vegada. Dues maneres.


On és el problema:

Els servidors Proliant tenen una vintena de sensors de temperatura "Sea of sensors" que envien informació al controlador del ILO (Integrated Lights Out), que permet l'administració de flotes de servidors de manera remota. Interessant per datacenters.

Aquest Controlador ILO porta unes corbes de PWM dels ventiladors que els fan treballar de manera molt sorollosa. 

A més a més, HP és mal amic dels hobbysts, i si instal.les memòries o targetes que no son de HP, els ventiladors també es posen a voltar a tope.

Provant de desconnectar els ventiladors, mala idea

Si es prova de desconnectar els ventiladors, el servidor no es vol engegar, mostrant l'error "Insufficient insufficient cooling solution" durant la etapa de POST, i aturant-se.

Mal rotllo.

Silencing HP Proliant ML110G7 for good. 2 ways.

Where's the problem:

Proliant servers have over 20 temperature sensors "Sea of Sensors" that feed ILO (Integrated Lights Out) Controller. This small engine allows for remote server management and supervision. This is interesting for datacenters.

But this ILO also has the PWM curves that define fan behavior for different temperatures. These curves are the responsible for Proliant Servers being noisy as a hooligan.

Also, HP is not very good friend of hobbists: installing non-HP ECC memory, or non-approved cards, will make your fan spin at top speed.

Disconnect fan connectors. A bad idea.

If you try to start the server with the fans disconnected, or connected to a spare fan controller, the server will complain with an error "insufficient cooling solution" during POST, continued by a shutdown.


SOLUCIÓ 1:

Fer un invent per saltar l'error de "insufficient cooling solution", i canviar ventiladors per ventiladors estàndard de Gaming i un controlador.


Examinem el connector dels ventiladors

SOLUTION 1:

Workaround the insufficient cooling solution error, and replace fans with gaming fans and a fan controller


Let's find info on fan connector pinout


Non original connector HP fan. Colors are compatible


Definició dels pins:
1:  Groc: +12V
2: Key, no connectat
3: Blau: PWM senyal control de velocitat.
4: Verd: Sensor de voltes
5: Blanc o negre: Detector presencia ventilador
6: GND

Com funciona:

  • Quan el 5 i el 6 es connecten junts, es detecta que hi ha un ventilador connectat.
  • TRUC: Perquè no es queixi de falta de senyal al sensor de voltes, cal connectar-lo també a GND i ja no es queixa.
Per tant, pontejar els pins 4 5 i 6 funciona!
 Pin definition:
1: Yellow: +12V
2: KEY (not connected
3: Blue: PWM speed signal
4: Green: Tachometer (speed sensor)
5: Black or white: Fan presence detector
6: GND

How does it work:

  • When pins 5 and 6 are connected together, system understands that there's a fan connected,
  • TRICK: To prevent system complaining about lack of tachometer signal, simply connect this pin to GND. Weird. But works.
So shorting pins 4, 5 and 6 works!


Shorting pins 4, 5 and 6 will allow starting your Proliant without fans, and not receive the insufficient cooling solution error.


O sigui que fent aquestes soldadures a la placa, permetrà que engegis el Proliant ML110G7 (i també el ML310eG8) sense ventiladors.

 Ara ja pots comprar una pila de ventiladors estàndard nous, i un controlador de ventiladors de Gaming, i refredar com vulguis el servidor, sense les corbes del ILO.
So, making these shorts in your mainboard, you'll be able to start your Proliant ML110G7 (and also the ML310eG8) without fans attached. 

Now you can get brand new standard fans, and a gaming fan controller, and install a new cooling solution, completely bypassing the ILO curves.


SOLUCIÓ 2:

Conservar els ventiladors originals, i només manipular la senyal del PWM, per a que vingui donada per un petit controlador "Aliexpress", interposat entre la placa i el ventilador, evitant que ILO tingui res a veure.

No cal manipular la placa base.

Curiosament, ILO dóna ordres de girar als ventiladors, però no supervisa les RPM del sensor de gir (tacòmetre)

SOLUTION 2:

Keep your original Proliant fans, and fake the PWM signal, through an "Aliexpress Zhiyu fan controller", interposed between the mainboard and the fan, sot that the signal is controlled by this, preventing ILO mess things.

No need to short anything in the mainboard.

Curious enough, that ILO pretends to drive FAN speed, but does not control the tachometer.


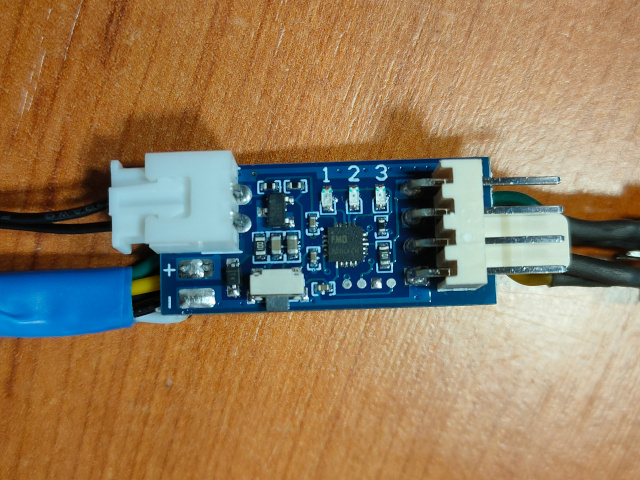
zhiyu interposer to control fans. Gets 12V and GND from mainboard, and generates PWM according to sensor. Tacho signal passes through.


Zhiyu programmable fan controller with sensor. Connects to 12V and feeds a 4 pin fan.


Per evitar tallar cables, comprarem connectors JST PHD2.0 de 2x3 pins i construirem un mòdul per intercalar entre el connector de la placa i el connector del ventilador.  To prevent cutting wires, I puchased JST PHD 2.0 2x3pin connectors, with the purpose to build a module interposed between the fan connector and the PCB connector. 


Original JST PHD 2.0 3x2 pin HP fan connector (left) Aliexpress JST PHD 2.0 3x2 connector (Right)


nterposer protected using thermoretractile tubeI


Pic shows 2 fan controllers interposed in place. Sensor is placed inside heatsink and in front of back fan.


Programació del controlador de ventiladors Zhiyu:

És molt senzill: és un autòmata de 4 estats:

Estat 1: Funcionament
Estat 2: Programació de la velocitat base (1-18)
Estat 3: Programació de la temperatura on començar a accelerar el ventilador (30º-70º)
Estat 4: Programació de la temperatura on velocitat=100% (+5ºC +50ºC)


L'interface d'usuari és tant sols 1 polsador, per tant, cal fer una combinació de pulsacions llargues, clic i doble clic, per anar seleccionant.
Programming the Zhiyu fan controller.

It's very easy: it is done in 4 stages:

stage 1: Working state
stage 2: Base fan speed setting (1-18)
stage 3: Set temperature to start accelerating the fan (30º-70º)
stage 4: Set temperature where speed=100% (+5ºC +50ºC)


User interface is tricky because it is a single button. Options need to be chosen through long click, click and couble click.


Zhiyu fan controller programming. 4 states.


Zhiyu controller fan curve


Zhiyu Fan controller Manual (Full)


Configuració que he posat:

Condicions:
- Tarda de final d'estiu a 29º de temperature
- utilitzant in Xeon E3-1240 
- CPU-Z stress CPU test

CPU:
- Base speed: 7
- Min Temp: 40
- Max Temp: +15

Ventilador darrere:
- Base speed: 5
- Min Temp: 40
- Max Temp: +15

Ventilador Frontal
- Base speed: 5
- Min Temp: 40
- Max Temp: +10

Amb la caixa tancada, la temperatura no passa de 65º
 Settings that work for me:

Conditions:
- Summer hot afternoon at 29ºC room temp.
- Using a Xeon E3-1240
- CPU-Z stress CPU test

CPU FAN:
- Base speed: 7
- Min Temp: 40
- Max Temp: +15

REAR FAN
- Base speed: 5
- Min Temp: 40
- Max Temp: +15

FRONT FAN
- Base speed: 5
- Min Temp: 40
- Max Temp: +10

Witht he enclosure closed, CPU temp is always under 65ºC


divendres, 17 de setembre del 2021

 Rapoo slim Keyboard repair.

Rapoo Keyboards are known to be unrepairable, because electronics housing is only reachable through keyboard membrane foil removal, but this is not possible since it is super-glued to the metal sheet. People that attempted this repair reported total destruction. Simply pry the cover out by breaking the screw threads. Then you will be able to repair the electronics. Rapoo keyboards are known to have very weak solder points in the charge connector. Be gentle when plugging/unpluging. I am very fond of Rapoo keyboards because they have the keys where they are expected to be, for a programmer: including that rare shaped enter key that you find in european keyboards, the small left shift that allows for the 103 key, the reasonable Fn alternative functions in arrow keys and function keys, and the Break key, the PrtScr, are all there. Even Dell and HP laptop keyboards fail some of these, and this is extremely annoying for pro use.

Video:


diumenge, 4 d’abril del 2021

ZHIYU 1X3L fan speed controller manual

 ZHIYU 1X3L fan speed controller manual


Els fabricants xinesos fan petites meravelles, però no disposen d'un manual que pugui facilitar l'ús.

Una autèntica llàstima.

Doncs l'he fet jo. No és la primera vegada que ho faig.


 Chinese manufacturers build some electronic PCBs that are a gem, but the lack of a manual make them very difficult to use.

A true pity.

Ok, I wrote a manual. It's not been the first time.


 ZHIYU 1X3L fan speed controller és un controlador de velocitat de ventiladors de 3 pins, amb sensor de temperatura.

S'hi poden configurar els següents punts:
  • Velocitat base del ventilador
  • Temperatura a la que comença a incrementar la velocitat
  • Temperatura a la que el ventilador anirà al màxim de velocitat

La velocitat màxima del ventilador no es pot configurar, donce vé donada per la velocitat del ventilador a 12V
 ZHIYU 1X3L fan speed controller is a fully configureable 3-pin fan speed controller, with temperature sensor.

These points are configureable:
  • Fan base speed
  • Temperature where fan speed starts to rise.
  • Top temperature where fan will be top speed.
Top fan speed is not configureable, since it will be fan's speed when powered at 12V.


 La configuració es porta a terme amb 1 unic botó, i 3 leds que tenen diversos significats.

Botó:
  • Pulsacions curtes i llargues
  • Pulsacions i dobles pulsacions
LED :
  • Led central fix, intermitent lent i intermitent ràpid
  • Leds laterals per indicar setting de les taules.

 Configuration is done using a single button and 3 leds with several meanings:

Button:
  • Short press and long press action
  • Single press and double click press.
LED
  • Middle led is steady, blinking slow or blinking fast
  • Side leds indicate setting

Manual:


Based on this excellent video: https://youtu.be/NBcCFYZhU_0

Please note that the Video will cover the "hidden feature" where the fan can be configured to remain off while temp is under "base temp speed".

Chinese american 104 key keyboard in 105 keyboard countries: key replacement using sharpkeys.

 Chinese american 104 key keyboard in 105 key keyboard countries: key replacement using sharpkeys.


 Els teclats americans son de 104 tecles, mentre que la pràctica totalitat dels teclats dels paisos europeus son de 105 tecles, n'hi ha que més i tot.

Si es compra un portàtil de renting, habitualment son amb teclats europeus, i amb alguns adhesius es pot solucionar, tot i que la forma d'algunes tecles (com l'enter) a vegades no és la que toca.

Si es compra un portàtil xinès, tots venen amb teclat americà (104 tecles) i es perden funcionalitats importants, com per exemple els símbols "<" i ">"

El cas que fa més mal és el del fabricant de tablets CUBE, que fa un teclat de 105 tecles amb un tacte millor que excel.lent, però una de les tecles s'assigna a fer sortir la cadena ".com", i no es pot redefinir per a fer sortir els símbols de la tecla que falta.
 American keyboards are 104 key, while about all european keyboards are 105-key. Some have even more.

When purchasing an ex-corporate used equipment, chances are that they are from european companies, so they are 105-key, and using them in Catalonia will only require some Spanish keyboard labels to attach to keys. Some keys may have different shape (enter), but it's a small issue.

But purchasing a chinese computer is a trouble, since they are 104-key american keyboards, and we will lack some important key, for example the "<" and ">" symbols.

The saddest one is found in CUBE tablet manufacturer, that builds a beyond-than-excellent keyboard with 105 keys, but one is dedicated to write the string ".com", and it is not redefinable.


Spanish 105 key keyboard


American ANSI 104 key keyboard with the keys that cause much trouble. Note that the enter key is different shape, hence, the "ç" is relocated, but the most important issue is that the "<" and ">" key is MISSING. How can I program, or mail, without this key?? Chinese manufacturers, can you see the problem?


Here we are the chinese Jumper ezBook 2 is missing the ">" "<" key


Workarounds I could see in other chinese keyboards: using the FN key


The saddest one: Cube chinese manufacturer, having developed an excellent 105 key keyboard, they use one key to produce the ".com" string, converting it to a 104 key keyboard. Cube, please!


There's a program here to help: Sharpkeys


 El programa sharpkeys, transforma una tecla en una altra. De fet, ho fa el propi windows, a través d'una clau de registre. El que fa el programa sharpkeys, és facilitar escriure aquesta clau de registre.

La idea és agafar una tecla que es faci servir poc, com és la del menú contextual de windows, i convertir-a en la tecla que falta "<" i ">".

Passos:

1: Buscar els Scan Codes de la tecla reemplaçada

2: Buscar els Scan Codes de la tecla a reemplaçar

3: Configurar-ho a Sharpkeys

4: Demanar a sharpkeys que posi la clau de registre

5: reiniciar.
 Sharpkeys program allows to convert a key into another. In fact, it is windows, that does the job, but sharpkeys helps you to write the registry key that does the magic.

We will replace a key that has few use, for the key we are interested. For example: the windows context menú key by the "<" and ">" key.

Steps:

1: Lookup the Scan Codes for the replaced key

2: Lookup the Scan Codes for the replacement key

3: Configure it in sharpkeys

4: Click the "Write to Registry" key to allow sharpkeys do the job

5: restart


Step 1 and 2 Scan Codes:

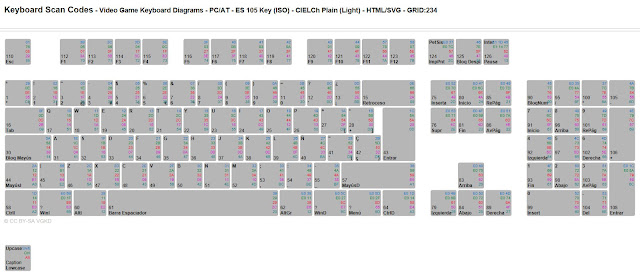
Find them in this excellent web: http://isometricland.net/keyboard/keyboard-list.php
Scroll down to "Keyboard Scan Codes".


I'll replace the "E0 5D" key (Menú) with the "00 56 Special ISO extra key" that will generate the "<" and ">" symbols that I'm missing, since my american ansi keyboard does not have the key there. (Not to be confused with E0 56)


Step 3: Sharpkeys configuration

Download here: https://www.randyrants.com/category/sharpkeys/


Add a key remapping:


Step 4 and 5: Write to registry and reboot.


Enjoy the new "<" and ">" key in the place of the context menú useless key.
A sticker ends the job.


dissabte, 20 de març del 2021

Jumper EZBook 2 model 464 keyboard repair


 Sembla ser que els teclats dels ordinadors Jumper (també sota les marques Injoo, Vexia, i Primux) de la serie EZBook tenen certa propensió a trencar-se.

Son equips de procedència xinesa i d'un mercat molt econòmic, això es nota en les seves poques capacitats per a poder ser reparats.

El principal problema és que el propi teclat conté la tecla de posta en marxa de l'ordinador, per tant, quan falla el teclat, l'ordinador no s'engega. No obstant, jugant una mica amb el flex del teclat, fent alguna mena de contacte, s'aconsegueix que l'ordinador s'engegi i amb un teclat usb extern es por fer servir, i comprovar que funciona.

Per tant, la reparació necessària és tan sols del teclat.

Vejam com es repara:


 Looks like Jumper EZbook keyboards are prone to failure (Jumper brand is also found under Injoo, Vexia and Primux brands).

These are chinese computers aimed to the cheap consumer. Don't expect them to be easily repairable.

Main issue is that the keyboard contains the power on button. Hence, you can't power on when you have a keyboard issue. Messing with the flex inside the connector you can manage to start the computer and see that nothing else is affected. You can use a usb keyboard to use the computer.

So, the required repair is only the keyboard.

Let's see how to repair Jumper EZbook:


1: Open back cover and remove mainboard


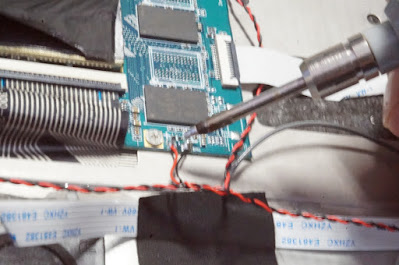
 Desfer els connectors de la bateria, LCD, teclat, touchpad, plaqueta de USB i auriculars i desoldar els cables dels altaveus i del micròfon.

 Unfasten battery connectors, LCD, keyboard, touchpad, usb+headphones assembly, and unsolder the speaker and microphone cables.


2: Remove LCD and battery.


 Desmuntar la plaqueta del usb i auriculars, desenganxar la bateria, que està enganxada amb cinta adhesiva i desmuntar tota l'assembly de la pantalla.


 Remove the usb+headphones assembly, remove battery (adhesive tape) and remove the whole screen+hinges assembly


3: Remove the keyboard cover and the keyboard assembly


 Aquesta és la part dificil: el teclat no està fet per a ser desmuntat: està dins d'una tapa metàl.lica que està muntada i soldada amb plastic fos, a la carcassa de l'ordinador.

Per tant, caldrà trencar tots els punts de soldadura, i després refer-los amb cola epoxi.
 This is the difficult part: keyboard is not meant to be repairable. It is inside a metal cover that is soldered, through melted plastic supports, to the plastic notebook palmrest cover.

Hence, we will need to crack all these solders, and redo later with epoxi.


4: Install replacement keyboard


 Hi ha dues versions d'aquest ordinador. Es diferencien per el tamany de la tecla que hi ha sobre l'enter. En el meu cas és la versió que a Aliexpress anomenen com a "new version".

Cal dir, que aquest és un Ezbook 2 amb un processador x5-z8300, i que és identificat en molts casos com un "primera edició".

El recanvi que cal comprar és el que s'indica al flex del teclat. En el meu cas posava MB3002003US

Durant la col.locació, cal refer els punts de soldadura

1) Superglue (cianoacrilat). Una petita gota de cola penetrant farà soldadura a la part que no és accessible. Posar-ne molt poca! Esperar 30 min per secar.

2) Araldit (epoxy). una gota gens penetrant, farà de soldadura per la part posterior. Deixar secar 2 hores.

Seria més senzill si ho haguessin fet amb cargolets, enlloc de soldadures de plàstic.
 There are several versions of this computer. You can see the key over the enter key, that sometimes is larger that other. In my case, Aliexpress said this is the "new version"

My Ezbook 2 has a x5-z8300 and is the new version. Not to be confused with the x5-z8350.

The final word is the part number shown in the keyboard flex: mine is: MB3002003US

New parts will need to be "resoldered" using glue:

1) Use Superglue (cianoacrilate). A VERY SMALL amount of superglue, being very penetrating glue, will help to attach the keyboard to the cover. Wait 30 minutes to allow for curation.

2) Use Araldit (2 component epoxy) not very penetrating to redo the solder points at the back. Allow 2 hours to cure (read glue manufacturer manual)

It would be probably easier if they used screws instead of melting plastic.


Superglue penetrating glue. Very small amount.

2-component epoxy to create a solder point.

Solder points done. Waiting for curation.

Install cover, place a weight on the cover. 
Dell heavy computing :-)

Again: a small drop of superglue to attach the inner part of the cover.

2-component epoxy to recover the solder point.


5: Reassemble


 Una vegada esperat el temps requerit pel fabricant de la cola epoxy, ja es pot muntar l'ordinador.

 Once the epoxy glue is cured (see glue manufacturer manual), we can reassemble the computer.


Palmrest recovered with a new keyboard.

Make sure this metallic adhesive tape is well attached to the cover. Nobody wants a short in the mainboard.

Resolder the speakers cables and the microphone.

Reattach the battery to the keyboard cover using new strong adhesive tape.

Reinstall LCD assembly and refasten all the flex cables. Finish with the battery connector.

EZBook 2 model 464 recovered!


 Un altre aparell que ha deixat de ser residu electrònic per a tornar a fer servei.


Materials i eines:

- Tornavis miniatura i palanca d'obrir carcasses de plàstic.
- Soldador electrònic i fil d'estany
- Cutter
- Superglue (cianoacrilat)
- Araldit (epoxy)
- Cinta americana per aguantar la bateria

 Another electronic device that will be saved from electronic waste. 


Materials and tools:

- miniature philips screwdriver and plastic pry tool
- Electric solder and tin/lead solder wire
- Cutter (precision knife)
- Superglue (cianoacrilate)
- 2-component epoxy
- strong adhesive tape to attach the battery.