dijous, 29 de desembre del 2016

Rock Solid B&W Speakers. Tweeter Replacement. Recanvi del Tweeter.

Entreteniments d'estiu.

Fa un temps vaig comprar un kit d'altaveus Rock Solid, fabricats per Bowers & Wilkins. Dos monitors i un Subwoofer passiu.

Una aproximació de la alta fidelitat per a ús en botigues, locals comercials, bars, preparats per un entorn més dur que no pas el domèstic. Bueno, res a veure, tot i que no sonen malament, i sonen molt millor que aquests altaveus de sonorització, que se solen muntar.

 Aquest kit era usat i els tweeters estaven fosos.
Summer entertainment job.

Some time ago I purchased a used speaker kit made by Rock Solid, they were manufactured by Bowers & Wilkins. Two monitors and a passive subwoofer.

They were an approximation of hifi for shops, bars, business environment with heavy duty conditions.
Well, sound is not that good, absolutely. But they are not bad at all, far better that these Public

Address plastic boxes. They were used with blown tweeters.

No en tinc ni idea de cap paràmetre dels tweeters originals.

Tampoc tinc cap pista de la SPL del woofer.
El filtre és de 2n ordre, però les bobines no tenen valor.

Pràcticament no queda més solució que, o bé posar-se a fer un anàlisi amb el generador de funcions, o bé provar. Aquesta vegada farem proves. En una altra ocasió amb unes ProAC SuperTower sí que va valdre la pena per l'anàlisi.
El primer intent va ser amb uns tweeters de Peugeot "Made by Harman" 96 333 557 80 Aquests tweeters de ben segur que son Audax, i es troben en molts altaveus de JBL (Harman Kardon), per exemple les J520M. Pertanyen a la família dels tweeters de mylar d'Audax, amb els AMTIW74 (titani), TW51A (del l'any 1983), TW010, TW014 i s'han fabricat en impedàncies de 4 ohms i 8 ohms, i en diverses SPL i diverses linealitats, alguns fabricats especialment per a marques. Hi ha dotzenes de clons d'aquests tweeters, fabricats per diverses marques, algunes, xineses.
I don't have any clue about original tweeters, impedance, spl.

I also don't have info about the woofer's SPL.

Filter is a 2nd Order (hopefully). But coils do not have any value.

Either we start a deep analysis with a function generator and a Frequency analyzer, or we just make some testing with spare tweeters. Making this is not worth the time. I previously did with a pair of ProAC Supertower and this time it was worth the time.

First attempt was with a couple of "Harman tweeters" from a Peugeot, model number 96 333 557 80, "Made in France". These tweeters must be Audax for sure. These can be found in lots of JBL hifi loudspeakers (for example J520M). They are part of the audax TW51A family of mylar dome tweeters, like AMTIW74 (titanium), TW51A (from 1983), TW010P1 and TW010E1, TW014... They were manufactured in 4 and 8 ohm, several SPL and several linearities, some custom made. There are lots of clones made by several manufacurers, lots of them, chinese.

See the Peugeot Harmann 96 333 557 80  tweeter on the left and he Audax TW010P1 on the right

Datasheets: http://www.audax.com/archives.php 

AMTW51A: https://drive.google.com/file/d/0B8jg2zfyBBjuanNjaGotWVlGTG8/view?usp=sharing TW010I1: https://drive.google.com/file/d/0B8jg2zfyBBjubWtmeGp1OHBIeEE/view?usp=sharing TW014R1: https://drive.google.com/file/d/0B8jg2zfyBBjubEhHdGQzbV9YQjQ/view?usp=sharing TM010A1: https://drive.google.com/file/d/0B8jg2zfyBBjuQTAwVy1TUmlCOWc/view?usp=sharing TW010E1: https://drive.google.com/file/d/0B8jg2zfyBBjuX2ZsSlNveWF3R1E/view?usp=sharing TW010F1: https://drive.google.com/file/d/0B8jg2zfyBBjuNTJrczJTQTFvV1U/view?usp=sharing
TW010P1: https://drive.google.com/file/d/0B8jg2zfyBBjub2hvZ2Y4N3JxblU/view?usp=sharing


Els que jo tenia TW010P1 son de 4 ohms i els de Peugeot crec que deuen ser el mateix perquè no noto diferència.

Una vegda muntats, el só era bó, per els Rock Solid Monitors, però lleugerament apagat si els utilitzàvem amb el subwoofer. Ja tenim una aproximació: 88dB son bons per els monitors però justos per el sistema amb subwoofer.
El Crossover respon bastant bé amb 4ohms, de manera que assumirem que el tweeter original era de 4 ohms.

Aquests tweeters son poc estimats per els usuaris de Peugeot perquè en els Peugeot estan mal filtrats, un simple condensador de 4,7uF fa de filtre de 1r ordre a 8KHz. El tweeter te una resposta bona fins a 14KHz i després cau 6dB fins a 20KHz. Aquesta resposta forma una panxa en 10KHz. Cal currar-se millor el filtre per a treballar amb els TW010P1.
En la meva opinió, no son mals tweeters, tenen una riquesa sonora molt maca, però la alinealitat a dalt de tot necessita que l'enginyer es curri més el filtre.

I had a couple of TW010P1 4 ohm tweeters and I guess Peugeot ones were the same because they measured and sounded the same.

Once assembled the sound was good for the Rock Solid Monitors alone, but slightly low when used with the Rock Solid Subwoofer. So we have an approximation: 88dB SPL are good for the monitors but low for the whole system.
Crossover is working reasonably well with 4 ohm so we could assume that the original tweeter was 4 ohm.

Peugeot owners don't like these tweeters. I guess it is due to a very wrong filtering (only a 4.7uF capacitor, that's a 1st order 8KHz crossover). Tweeter works well till 14K, and then falls 6dB until 20KHz. This is not making a good sound.
In my honest opinion, these are not bad tweeters. They are rich sounding, but that -6dB at the top require a lot of engineering in the xover.


El següent intent ha estat amb uns tweeters de car audio de 90dB 4ohm. He trobat uns Coral Electronics CT35.
El manual dels Coral CT36 posa que tenen 90dB. No tinc la gràfica de SPL. Provarem.

Amb els tweeters a les mans, diria que son un clon dels Audax TM010A1 però Coral és una bona marca.

Encaixen a la perfecció al forat de la caixa.

He tret el filtre incorporat que portaven: el famós condensador de 4.7uF.
Next attempt I tried a couple of car audio tweeters, 90dB and 4ohm. I found a pair of Coral Electronics CT35.
I can read in the Manual for Coral CT36 that they are 90dB, but no SPL graphic.

With the tweeters disassembled I'd say that these are Audax TM010A1 clones, but Coral is a reputated brand.

They fit *perfectly* in the box hole.

I've removed the integrated filter: the 4.7uF cap.


Una vegada instal.lats son exactament el contrari que els Audax

Tenen una zona alta molt brillant, els 2dB adicionals es noten, però per sota queden lleugers. Els plats han guanyat brillantor, però les cordes (piano, mandolina, guitarra clàssica) han quedat sense detall, i les veus son lleugerament nasals.

Potser sí que el tweeter original era de 8 ohms. Posar un tweeter de 4 ohms en un filtre dissenyat per a 8 causa que la freqüència de tall per el tweeter es dobli.
O potser la SPL d'aquest tweeter és així.

Humm... caldrà pensar més.
Once installed, they sound just opposite from the Audax:

Extreme highs are good and these 2 extra dB make the job. But they are thin below. The cymbals are well present but all string instruments lost detail (piano, classic guitar...). Voices got nasal. Too lean mid-high zone.

Maybe the original tweeter was 8 ohm. Using a 4 ohm tweeter in a 8 ohm designed crossover causes the cut frequency to double for the tweeter.
Or maybe this tweeter's SPL is like this.

Humm... let's think more.


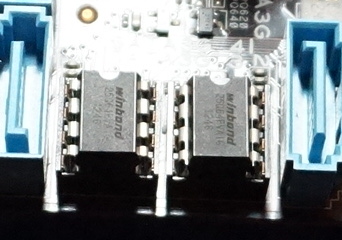
1 dia després.

Humm, això caldrà fer-ho bé. Doncs fem-ho!

Desmuntem el Crossover i mesurem les peces, llavors farem simulacions. He fet servir un tester LCR

  • El woofer és de 4 ohms (2.4ohm DC)
  • Una bobina és de 0.33mH
  • L'altra bobina és de 0.17mH
1 day later.

Humm this ought to be done seriously. OK, let's do it.

Let's disassemble the crossover and measure the coils. I used a LCR multimeter.


  • Woofer is 4 ohms (2.4ohm DC)
  • One inductor is 0.33mH
  • The other one is 0.17mH

Rock Solid Monitor Crossover


Anem a fer la simulació amb un tweeter de 4 ohms (Orcad PsPice)Let's make some simulation with a 4 ohm tweeter (Orcad PsPice)


Anem a fer la simulació amb un tweeter de 8 ohms (Orcad PsPice)Let's make some simulation with a 8 ohm tweeter (Orcad PsPice)


CONCLUSIONS:

Pel que veiem, la freqüència de tall efectiva canvia poc (3500Hz), i en el cas del tweeter de 4 ohms, queda excessivament apagat, mentre que en el cas de 8 ohms puja prou bé.

Això coincideix amb el que hem observat (escoltat) a les proves reals.

Així doncs, nou projecte: aconseguir un tweeter de 8 ohms que doni 88-90dB.
Hi ha una resistència de 1.5ohm que ens permetrà acabar d'ajustar la sensibilitat.

Continuarà....
CONCLUSSIONS:

We can see that crossover frequency barely changes (3500Hz) but when using a 4ohm tweeter, it gets few power and a bad mirange-high. A 8 ohm tweeter works much better.

This is what we could see (listen) in real testing.

So new project: get a 8 ohm tweeter in the range of 88-90dB.
There is a 1.5ohm resistor that will let us match the sensibility.

To be continued...


6 mesos després...

Resulta car anar comprant tweeters. Enlloc de gastar diners anem a gastar unes quantes neurones per a adaptar el tweeter Coral CT35. Això vol dir feina seriosa amb el Crossover.

OK partim que perseguim això: aquesta és la simulació del filtre original.
   
... 6 months later...

Purchasing tweeters is expensive. Instead of spending money, let''s spend some time trying to get the most of the Corals CT35. This means serious work with the Xover.

We are trying to get this: (this is the response of the original filter)

Original crossover response.


Construeixo un full de càlcul amb les fórmules per a saber la Q del filtre. M'ajudo de  de la web de Rod Elliott:
http://sound.whsites.net/lr-passive.htm

I build a spreadsheet to guess the Q of the filter. I use the formulas in the Rod Elliott web:
http://sound.whsites.net/lr-passive.htm


El full de càlcul calcula tots els Condensadors i totes les Bobines per una determinada freqüència de tall, i coloreja la cel.la dels components que coincideixen (10% tol) amb amb les trobades al disseny. En el punt que coincideixen tant el valor de la bobina com el condensador, trobem la Q

Q= 0.65 per el filtre del Woofer (Bessel)
Fc=2500Hz
Q=1,15 per el filtre del Tweeter (Butterworth)
Fc=6500KHz
Spreadsheet calculates all the Coil and Capacitor values for the different Q, given a Cut frequency. When the values are equal (10%tol) to the componenents in the filter, the cell is coloured. When both cells, cap value and coil value are the same as the original component, we can guess the Q of the filter.

Q=0,65 for the Woofer filter (Bessel)
Fc=2500Hz
Q=1,15 for the Tweeter (Butterworth)
Fc=6500Hz


Vull mantenir la Q del filtre perquè probablement el woofer tingui unes mancances que requereixi que el tweeter actuï d'aquesta manera tant rara.

Mantinguent Fc=6500 i Q=1,15, cercarem els nous valor de L i de C per el tweeter de 4 ohms.

Utilitzant el full de càlcul puc trobar L=0,08mH i C=7uF
En components reals, podriem escollir:
L= 0,1mH (Visaton la fabrica)
C=6,8uF 
I want to keep the Q of the filter because the woofer probably has a response that needs the tweeter to work that strange way.

I keep Fc=6500 and Q=1,15. Now I need to calculate the new L and C values for the 4 ohm tweeter.

Using the spreadseet I can find L=0,08mH and C=7uF
Standard component values:
L=0,1mH (manufactured by Visaton)
C=6.8uF


Anem a comprovar la resposta amb el PsPice Let's see the response using OrCAD PsPice

Modified Crossover Response trying to match original filter but using a 4 ohm tweeter


La resposta és molt similar a la del filtre original. Aquesta vegada probablement l'hem encertat,
El tweeter està 2.5dB atenuat respecte el woofer per la resistència en serie de 1.5ohm Aquesta resistència ens ajudarà a adaptar les sensibilitats. No sabem la sensibilitat de cal dels drivers, haurem de treballar-ho a "orella"
Frequency response is very close to the original filter. I think this time we guessed it.
Tweeter is 2.5dB under the woofer SPL due to the series 1.5ohm resistor. This resistor helps to match both drivers' SPL. We do not have data about the SPL of any of the drivers, so we will need to experiment.


Muntem els components nous al Crossover. Els components es poden trobar amb relativa facilitat a eBay. Let's assemple new compoenents to the Xover. New components can be easily found at eBay.


Original Rock Solid Monitor Xover


Modified Rock Solid Monitor Xover.


Final feliç per els monitors Rock Solid:
FUNCIONEN ESPLÈNDIDAMENT

Ha sigut necessari canviar la resistència en serie de 1.5ohms per una de 1 ohm (veure foto) per a alinear bé la sensibilitat dels dos altaveus.

La reproducció és francament bona: detallada, amb tot l'aire que abans faltava, amb una zona de mitjos potent i "musical", uns aguts clars, i uns greus (donats per el subwoofer) de gran calidesa.

Una peça que va molt bé per a ajustar Crossovers és "Willie Dixon - Save my child"  https://youtu.be/u_NokJ-fSpw
Tenim bons greus, una zona mitja amb uns detalls de respiració que cal assegurar de reproduïr i una secció metàl.lica que treballa les zones del crossover.

Llista de components:

2 x Coral CT35 mylar tweeter (probablement molt semblant als Audax TM010A1 però amb millor SPL)
2 x Condensador 6.8uF NP
2 x Bobina d'aire Visaton 0.1mH
2 x Resistencia 1 ohm 5 watts
Great ending for the Rock Solid Monitors
THEY WORK VERY WELL!

I had to replace the 1.5ohm series resistor by a 1ohm one (see photo) to match both drivers SPL.

Sound quality is pretty good! detailed, powerful, yet has enough air that was lacking before. Midrange is fine and overall warm with crisp treble.

A good test piece is "Willie Dixon - Save my child" https://youtu.be/u_NokJ-fSpw
We have deep bass, great mirdange with breathe details that need to be there, and some metal instruments that will help to test the xover zone. Very nice!


Bill of materials:

2 x Coral CT35 mylar tweeter (probably very close to Audax TM010A1 but having better SPL)
2 x Capacitor 6.8uF NP
2 x Air Coil Visaton 0.1mH
2 x Resistor 1 ohm 5 watts

dissabte, 8 d’octubre del 2016

Western Digital MyBook Live debrick. Reparació MBL

He tingut diversos NAS per casa, un Lacie NetworkSpace 1, un Dlink DNS323 i aquest WD Mybook Live de 2Tb. El WD no és molt popular, tot i que jo crec que és un aparell molt interessant perquè és molt més ràpid que els anteriors (4MBytes/s, vs, 11Mbytes/s vs. 32Mbytes/s) a un preu contingut. N´hi ha de més ràpids, però no es pot dir que vagi "malament".

El cas és que el disc va morir, i vaig pensar en canviar-lo, però el problema és que el disc es va emportar el sistema operatiu del NAS. Canviar el disc no ressucitava l'aperell.

I've used several NAS devices at home, a Lacie NetworkSpace 1, a Dlink DNS323 and this WD MyNook Live 2Tb. WD MBL is not very popular, but I find it is quite an interesting device because it offers speed versus low price (4MBytes/s for the Lacie, 11Mbytes/2 for the DNS323 and 32Mbytes/s for the MBL).

So life is hard for these devices and disk died. I inmediately thought about a disk replacement, but the problem was that the operating system of the device went with the disk,so a new disk will not get the device back to life.


Cercant per internet veig que és un aparell amb Linux Embedded! perfecte, això es deixarà remenar! Sembla que la CPU és un PowerPC... hummm.

Com que no soc el primer que se li peta un WDMybook Live, ja hi ha altra gent que s'hi ha barallat i solidàriament han escrit guies i tot. Per tant jo també ho faré,

Guia versió 1: basant-se en un script que a mi no em va funcionar per problemes amb el soft de RAID.
https://community.wd.com/t/guide-how-to-unbrick-a-totally-dead-mbl/56658

Guia versió 2: basat en una imatge de disc dur.
https://community.wd.com/t/guide-debrick-mybooklive-v2-0/58546

Alguns detalls de com es fan les coses des del shell de linux de l'aparell:
http://mybookworld.wikidot.com/forum/t-368098/debricking-script-that-can-keep-data

Jo vaig fer mig d'una cosa i mig de l'altre. Jo vaig preferir preparar el nou disc utilitzant la controladora del MyBook Live i la seva consola SSH.
Reading in Internet I could find that this device has Linux Embedded!. Excellent, this is going to be fun. But CPU is a PowerPC, hummm..

I'n not the only one that had a dead WD MyBook Live. Other people generated lots of documentation on their research and this helped me a lot: (so in turn I write too this documentation)

Debrick Guide v1: based on a script that didn't work for me due to software RAID issues.
https://community.wd.com/t/guide-how-to-unbrick-a-totally-dead-mbl/56658

Guia versió 2: based on a 1Tb disk drive image.
https://community.wd.com/t/guide-debrick-mybooklive-v2-0/58546

Scripts, shell commands issued inside the shell of the device...
http://mybookworld.wikidot.com/forum/t-368098/debricking-script-that-can-keep-data

I did a mix of some of these procedures.
I preferred to prepare the disk using the MBL controller and the SSH console.

1: Disassembly:


2: Disk Replacement:


Molta gent diu que el disc s'ha de canviar per un disc Western Digital i que ha de ser especialment un WD Green. Potser per el Script de debrick.sh sí que es necessari, però jo ho he pogut fer anar amb:

  • Hitachi 721010KLA330 de 1Tb
  • Seagate de 2Tb
  • WD20EZRX (Blue de 5400rpm)
Sí que he d'admetre que vaig tenir problemes amb un WD20EARX que tenia per aquí: el disc sembla funcionar correctament però en el moment de voler-lo formatejar des del controlador del MyBook Live no avança.


Lots o people think that they need to replace the disk with a WD one, and that it needs to be a WD Green of some sort. Maybe the debrick.sh script requires this, but I got it to work with next disks:
  • Hitachi 721010KLA330 de 1Tb
  • Seagate de 2Tb
  • WD20EZRX (Blue de 5400rpm)
I have to admit having problems with a spare WD20EARX I had laying around. Disk works when plugged to a PC, but it gets stuck when required by the WD MyBook Live Controller.

WD MyBook Live using a Hitachi Deskstar 721010KLA330 1Tb disk.

3: Operating system reinstall:


Bàsicament la Guia 2 funcionarà: es basa en enxufar el disc en un PC amb Linux:

  1. Enxufar el disc en un PC amb Linux.
  2. Clonar amb dd una imatge d'un MyBookLive de 1Tb en el nou disc, amb les particions, el Raid, el Swap, tot apunt.
  3. Cas que el disc sigui de 2Tb, fer servir el programa gparted per a agrandar-les.
  4. Enxufar al controlador de WD MyBook Live i engegar.


De resultes de les trifulques amb el WD20EARX que no va funcionar, vaig aprendre a fer part del procés amb la controladora del MyBook Live. Com que el disc ha de funcionar amb aquesta controladora, crec que sempre millor fer-ho així.

El meu problema és que el WD20EARX funcionava en el PC però no funcionava amb la controladora del MyBook Live

Guide 2 will work: it is based on:

  1.  plugging the new disk to a Linux PC
  2. Clone using dd an image from a 1Tb MBL to your new disk. You will get your Raid and your Swap working quite straightforward.
  3. If the disk is 2Tb you'll need to use gparted to enlarge the partitions.
  4. Plug the disk to WD MBL controller and start.
I was mad with WD20EARX not working so I learned better ways to go: Since the disk needs to work with the MBL controller, I do most part of the process using the MBL controller and not the PC. 

My WD20EARX worked in the PC but didn't work with the WD MBL Controller. weird.

3.1 Get the WD MyBook Live 1Tb image / Aconsegueix la imatge del WD MyBook Live de 1Tb


Instal.lar en el teu linux el 7zip

  • apt-get install p7zip-full
Després descarrega la imatge de:
La descomprimeixes i obtindras mybook.img
  • 7z x mybook.7z
Install 7zip in your linux

  • apt-get install p7zip-full
Download MBL 1Tb filesystem image from
Decompress the file and get mybook.img
  • 7z x mybook.7z

3.2 Write the image to the disk / Instal.lar la imatge al disc:


Endolla el disc nou al teu ordinador Linux (o fes servir un LiveCD però potser et quedaràs sense espai per operar). Pots enxufar-lo al USB o directament al SATA.

Pots trobar si està al sda, o sdb o sdc o sdd amb la comanda lsblk. A mi em va quedar al sdb, doncs al sda tinc el disc dur del PC

Llavors clones la imatge: (substitueix sdb per el que convingui.

  • dd if=mybook.img of=/dev/sdb bs=1M

És important el bs=1M perquè si no tardarà una eternitat.
Plug your new disk to your Linux PC (or use a LiveCD but you may run out of space to work). Use a a USB-SATA or plug directly to SATA.

Locate your device (sda / sdb / sdc / sdd) using lsblk command. I got mine at sdb becuase sda was my boot disk.

Then clone image: replace sdb by what you need to make it work.
  • dd if=mybook.img of=/dev/sdb bs=1M
bs=1M is important. It will last forever if you miss it.


3.3 Install the disk to the MBL controller and operate there. / Instal.la el disc a la controladora del MBL i operar des d'allà.


Instal.la el disc a la controladora del MBL, connecta corrent i xarxa.

Engega el MyBookLive i veuràs que després de 3 minutets ja es posa verd.

Localitza la IP del MyBookLive amb un Portscanner. El meu estava a 192.168.1.103


Connecta't-hi amb el navegador i Acceptes els drets d'ús i entres. Veuras que indica que el disc és de 1Tb

  • http://192.168.1.103

Llavors habilites l'accés per SSH

  • http://192.168.1.103/UI/ssh
Ara t'hi connectes per ssh.
  • Per a Windows: putty usuari root
  • Per a Linux: ssh root@192.168.1.103
  • Password: welc0me
Attach the MBL controller to the disk and plug network and power.

After 3 minutes LED will be green.

Locate MyBookLive IP address using a PortScanner
Connect using a browser, accept the terms of use and login. You will see that the disk is 1Tb.
  • http://192.168.1.103
Llavors habilites l'accés per SSH

  • http://192.168.1.103/UI/ssh
Now connect through SSH
  • For Windows: use putty user root
  • For Linux: ssh root@192.168.1.103
  • Password: welc0me

3.4 Make the new Data Partition (Enlarge to 2Tb) / Fes la nova partició de dades (allargar fins a 2Tb)


Per a allargar la nova partició, eliminarem la de 1Tb que hi ha a la imatge que hem clonat, i la farem nova amb les característiques que toquen.

Com que no podem tocar particions que estan en ús (compartides) primer evitarem que el MBL les munti.
  • cd /etc/init.d
  • mv mountDataVolume.sh mountDataVolume.shBAK
  • reboot
Espera 2 minuts que reinicii. Torna a entrar.
  • ssh root@192.168.1.103
Parem els serveis que no han de funcionar sense la pertició de dades:
  • /etc/init.d/mionet stop
  • /etc/init.d/twonky stop
  • /etc/init.d/itunes stop
Ens assegurem que les particions de dades no estan actives:
  • umount /CacheVolume
  • umount /nfs
  • umount /shares
  • umount /DataVolume
Ara reparticionem
To enlarge the partition we will delete the 1Tb partition from the image we cloned and will make the new one with the propper options.

Since we can't mess with partitions in use, we need to prevent the MBL from mounting them.

  • cd /etc/init.d
  • mv mountDataVolume.sh mountDataVolume.shBAK
  • reboot
Wait 2 minutes for the MBL to restart and login again
  • ssh root@192.168.1.103
Stop the services that should'n work without the data partition:
  • /etc/init.d/mionet stop
  • /etc/init.d/twonky stop
  • /etc/init.d/itunes stop
Make sure that the data partitions are not munted:
  • umount /CacheVolume
  • umount /nfs
  • umount /shares
  • umount /DataVolume
Now we repartition:


3.4.1: Fix the partition table. / Arreglem la taula de partició


Per alguna extranya raó la taula de partició no està del tot bé, reparar-la.
Llavors arreglar la taula perquè vegi que l'espai del disc és de 2Tb i no de 1Tb.
For some strange reason, partition table is corrupt in the image we used. Fix.
Then fix partition table to see the available disk space of 2Tb.

MyBookLive:~#parted
(parted) p
Error: The backup GPT table is corrupt, but the primary appears OK, so that will
be used.
OK/Cancel? ok
Warning: Not all of the space available to /dev/sda appears to be used, you can
fix the GPT to use all of the space (an extra 1953504000 blocks) or continue
with the current setting?
Fix/Ignore? fix

3.4.2: Remove old 1Tb partition. / Esborrar la vella partició de 1Tb.


(parted) p                                                              
Model: ATA WDC WD20EARX-00P (scsi)
Disk /dev/sda: 2000GB
Sector size (logical/physical): 512B/512B
Partition Table: gpt

Number  Start   End     Size    File system     Name     Flags
 3      15.7MB  528MB   513MB   linux-swap(v1)  primary
 1      528MB   2576MB  2048MB  ext3            primary  raid
 2      2576MB  4624MB  2048MB  ext3            primary  raid
 4      4624MB  1000GB  996GB   ext4            primary

(parted) unit s                                                        
(parted) p                                                              
Model: ATA WDC WD20EARX-00P (scsi)
Disk /dev/sda: 3907029168s
Sector size (logical/physical): 512B/512B
Partition Table: gpt

Number  Start     End          Size         File system     Name     Flags
 3      30720s    1032191s     1001472s     linux-swap(v1)  primary
 1      1032192s  5031935s     3999744s     ext3            primary  raid
 2      5031936s  9031679s     3999744s     ext3            primary  raid
 4      9031680s  1953523711s  1944492032s  ext4            primary

(parted) rm 4                                                          
Warning: WARNING: the kernel failed to re-read the partition table on /dev/sda
(Device or resource busy).  As a result, it may not reflect all of your changes
until after reboot.


3.4.3: Create the 2Tb partition. / Crea la partició de 2Tb


(parted)  mkpart primary 9031680s -1

Warning: You requested a partition from 9031680s to 3907029167s.        
The closest location we can manage is 9031680s to 3907029134s.
Is this still acceptable to you?
Yes/No? yes                                                            
Warning: WARNING: the kernel failed to re-read the partition table on /dev/sda
(Device or resource busy).  As a result, it may not reflect all of your changes
until after reboot.
(parted)            
(parted) p                                                              
Model: ATA WDC WD20EARX-00P (scsi)
Disk /dev/sda: 3907029168s
Sector size (logical/physical): 512B/512B
Partition Table: gpt

Number  Start     End          Size         File system     Name     Flags
 3      30720s    1032191s     1001472s     linux-swap(v1)  primary
 1      1032192s  5031935s     3999744s     ext3            primary  raid
 2      5031936s  9031679s     3999744s     ext3            primary  raid
 4      9031680s  3907029134s  3897997455s  ext4            primary

(parted) unit GiB                                                      
(parted) p                                                              
Model: ATA WDC WD20EARX-00P (scsi)
Disk /dev/sda: 1863GiB
Sector size (logical/physical): 512B/512B
Partition Table: gpt

Number  Start    End      Size     File system     Name     Flags
 3      0.01GiB  0.49GiB  0.48GiB  linux-swap(v1)  primary
 1      0.49GiB  2.40GiB  1.91GiB  ext3            primary  raid
 2      2.40GiB  4.31GiB  1.91GiB  ext3            primary  raid
 4      4.31GiB  1863GiB  1859GiB  ext4            primary

(parted) quit                                                          
Information: You may need to update /etc/fstab.    
                 
MyBookLive:~# reboot

Acabarem reiniciant per assegurar que el Kernel llegeix bé les particions

Tardarà 2 minuts en reiniciar i tornaran a quedar les particions desmuntades.
We restart to let the Kernel read he new partitions.

After 2 minutes the MBL will be up again with the partitions unmounted.


3.4.4: Format the filesystem the propper way / Formateja correctament el filesystem.


Llegint els scripts interns d'inicialització, (/usr/local/sbin/factoryRestore.sh) podem veure que els formateja amb un BlockSize de 65535.
  • ssh root@192.168.1.103
Parem els serveis que no han de funcionar sense la pertició de dades:
  • /etc/init.d/mionet stop
  • /etc/init.d/twonky stop
  • /etc/init.d/itunes stop
Ens assegurem que les particions de dades no estan actives:
  • umount /CacheVolume
  • umount /nfs
  • umount /shares
  • umount /DataVolume
Ara formategem:

  • mkfs.ext4 -b 65536 -m 0 /dev/sda4
Reading the internal factory initialization scripts (/usr/local/sbin/factoryRestore.sh) we can see that the filesystem needs to be format using a BlockSize of 65535.
  • ssh root@192.168.1.103


Stop the services that should'n work without the data partition:
  • /etc/init.d/mionet stop
  • /etc/init.d/twonky stop
  • /etc/init.d/itunes stop
Make sure that the data partitions are not munted:
  • umount /CacheVolume
  • umount /nfs
  • umount /shares
  • umount /DataVolume
Now we format:
  • mkfs.ext4 -b 65536 -m 0 /dev/sda4


3.4.5: Prepare for FactoryRestore and it will be like new! / Preparem per a FactoryRestore perquè quedi com nou.


Tornem a posar el script perquè munti les particions de dades:


  • cd /etc/init.d
  • mv mountDataVolume.shBAK mountDataVolume.sh


Posem els tokens per a obligar a fer un FactoryRestore utilitzant el script del fabricant.


  • /usr/local/sbin/factoryRestore.sh
  • reboot


En reiniciar començarà el procés de inicialització i quedarà com nou.
Tardarà 35 minuts.

We recover the patition mount script back.


  • cd /etc/init.d
  • mv mountDataVolume.shBAK mountDataVolume.sh


We place the tokens to force a Factory Restore using the manufacturer's script


  • /usr/local/sbin/factoryRestore.sh
  • reboot


After restart it will initialize and in 35 minutes it will be like new.


3.4.6, Update Firmware, Device Test...


Quan hagi acabat ja pots entrar altra vegada a través del navegador, comprovar que el dic és de 2Tb, tornar a habilitar el ssh si vols i pots:

  • Actualitzar el Firmware
  • Fer un test del dispositiu.
Tot funciona.
Once finished, login again through browser, check that your disk is 2Tb, you can enable again SSH if you wish to.
Reccomended:
  • Update firmware
  • Do a device test


You'll see that everything works fine.

Fixing bad sectors / Arreglant sectors defectuosos:


Els MyBook Live es van fent vells i alguns experimenten l'aparició de sectors defectuosos.

Per a detectar-los, aplica:

Procediment per a evitar que es muntin les particions


  • ssh root@192.168.1.103
  • cd /etc/init.d
  • mv mountDataVolume.sh mountDataVolume.shBAK
  • reboot
Parem els serveis que no han de funcionar sense la pertició de dades:
  • ssh root@192.168.1.103
  • /etc/init.d/mionet stop
  • /etc/init.d/twonky stop
  • /etc/init.d/itunes stop
Ens assegurem que les particions de dades no estan actives:
  • umount /CacheVolume
  • umount /nfs
  • umount /shares
  • umount /DataVolume
I llavors engeges un test ReadWrite no destructiu per a detectar els sectors defectuosos:
  • fsck -vcck /dev/sda4
Compte que tardarà 40 hores! No tnaquis el ssh.

Per a saber quins blocks estan malament:
  • dumpe2fs -b /dev/sda4
Recupera el muntatge de les particons de dades i reinicia

  • cd /etc/init.d
  • mv mountDataVolume.shBAK mountDataVolume.sh
  • reboot

MyBook Live are getting old and develop bad sectors from time to time.

To check for them do:

Prevent the mounting of data partitions:


  • ssh root@192.168.1.103
  • cd /etc/init.d
  • mv mountDataVolume.sh mountDataVolume.shBAK
  • reboot
Stop the services that need to be down when there is no data partition
  • ssh root@192.168.1.103
  • /etc/init.d/mionet stop
  • /etc/init.d/twonky stop
  • /etc/init.d/itunes stop
Make sure that data partitions are not active
  • umount /CacheVolume
  • umount /nfs
  • umount /shares
  • umount /DataVolume
Start a non-destructive read/Write Test
  • fsck -vcck /dev/sda4
It will last for 40 hours! Don't close ssh.

To know what sectors were marked bad
  • dumpe2fs -b /dev/sda4
Recover the patition mount script back.

  • cd /etc/init.d
  • mv mountDataVolume.shBAK mountDataVolume.sh
  • reboot

divendres, 2 de setembre del 2016

De-Bricking an ASUS P8B75-M LX


Ara fa uns dies vaig comprar al Wallapop una placa ASUS P8B75-M LX a un tal "Manolo B" de Calella. El tio em va prometre que funcionava... vaja, que no funcionava. Em vaig queixar i el tio volia que li fes un reballing and una pistola de calor (decapadora). Sembla que aquests aprenents de bruixot han descobert la sopa d'all amb les decapadores. Tot s'arregla recremant-ho una mica. Apart de les accions empreses, vaig intentar reparar-la, i me'n vaig sortir! Some days ago I purchased from Wallapop user "Manolo B" an ASUS P8B75-M LX in Calella de Mar (Catalonia). He told me that is was working proppery. It was not. I complained and he wanted me to apply heat with a heat gun. These people think that heat guns have magic beams that can repair everything, duh! Well, I tried to repair it, and I got to work!


ASUS P8B75-M LX mainboard.


Aquests eren els símptomes:


  1. Quan s'hi connectava la font, el LED de la placa es posava verd
  2. Quan s'apretava el botó de power, els ventiladors es posaven a girar, però no apareixia res per la pantalla
  3. Si es provava d'engegar sense les memòries, pitava piiip-pip-pip.
  4. Provat amb vàries RAMs i varies VGA.
  5. Esborrada la CMOS.
  6. Provat amb diversos processadors, fins i tot els suportats amb la primera versió de la BIOS, doncs és freqüent que si el processador no està suportat per la BIOS no s'engegi, i faci falta trobar un altre processador per a poder fer l'update.

Havent revisat la placa minuciosament, vaig desconfiar de la BIOS. La placa porta el sistema CrashFree 3, que incorpora 2 xips de BIOS, per tant hauria de suportar gitanades. 
These were the simpthoms:

  1. When I apply power to the board, I can get the onboard led to get lit. So it gets power.
  2. When I press power button I can get fans to spin, but nothing appears in the screen.
  3. When I try to start with the RAMs removed, I can hear beeep-pip-pip
  4. Tested with several RAMs and VGAs.
  5. Erased CMOS.
  6. Tested several processors, even those supported with the very first version of the BIOS. It is quite common that a board does not start when BIOS does not support a processor. It requires getting a supported processor, in order to start and update the BIOS, and then start with the newer processor.
I revised the board toroughly. Maybe it was the BIOS?. This board uses ASUS CrashFree 3 that has 2 BIOS chips to support flashing failures.

Asus CrashFree 3 Dual Bios based on Winbond 25Q64FVA1G series 25 SPI chips.


No hi havia manera de poder interactuar amb la placa, era ben morta, de manera que va ser necessari un lector/gravador de memòries SPI series 24 i series 25.

N'hi ha un de ben econòmic que es diu CH341A, que vaig comprar a l'eBay.

El software es pot baixar d'aquí:

  • CH341A software, aquest software no té virus, com altres que podeu trobar per la xarxa, i està basat en aquesta feina de Kris Kasprzak en aquest vídeo
  • Per a instal.lar-lo, només cal baixar la carpeta, i executar "driver-- 24CXX25XX.exe" 
  • Llavors executar CH341A.exe per a posar en marxa el programador. Prement "detect" hauria de detectar el xip que poseu al sòcol.

The mainboard was dead, so nothing to do with it. I required a SPI series 24 & 25 memory programmer.

There is a very cheam one called "CH341A", and of course eBay is your friend.

Required software can be downloaded from here:

  • CH341A software. This software is clean from virus. Other versions you'll find in the net have pests attached. It is based on Kris Kasprzak work in this video.
  • To install, simply doubleclick on driver-- 24CXX25XX.exe. This will install the drivers.
  • Then execute CH341A.exe to start the programmer software. Press the "detect" button and it should detect the SPI chip you inserted in the programmer socket.

CH341A programmer as purchased at eBay


Vaig llegir els dos xips i en vaig guardar còpia de seguretat (molt important).

El programador em va detectar les Winbond 25Q64FVA1G com unes W25X64 de 8Mbytes.

Vaig comprovar que el contingut era molt diferent. Així doncs, no semblava pas que us fos còpia de seguretat de l'altre.

Llegint en un post de hardforum.com, vaig veure que algú havia fet unes eines FD44Editor per a poder manejar BIOS de ASUS. Descarrega'l d'aquí si no existeix al GitHub.

Aquest programa permet veure la personalització del firmware per la placa, és a dir, la MAC address de la xarxa, el número de sèrie, el UUID...,
De fet, també permet agafar una BIOS neta del fabricant i personalitzar-la amb aquesta informació per a flashejar-la al xip. Vaja, la feina que fa el programa d'actualitzar la BIOS.

Així doncs, aquest programa agafa un arxiu BIN (lectura d'un arxiu de BIOS), n'extreu unes dades, agafa un arxiu CAP (BIOS descarregada des de la web d'ASUS) i insereix aquestes dades. El resultat és un arxiu BIN preparat per a programar un xip.

Trobareu molta info a hardforum.com
I read both chips and I kept backup of both contents. (very important).

Programmer detected both Winbond chips 25Q64FVA1G as W25X64 having 8Mbytes each.

I could check that both chips contents were *very* different. I expected that one was the backup of the other. I expected to find them very similar.

Reading a post in hardforum.com I could see that somebody wrote a program to work ASUS bios named FD44Editor. Download from here if it is not available at GitHub.

This program allows you to see the mainboard's particularization of the BIOS, having the motherboard serial number, the system UUID, Ethernet MAC address....
In fact, this program also allows you to get this info, and write it into the manufacturer's BIOS file downloaded from ASUS Support website, so, obtaining the file ready to be flashed to the Bios Chip. The same job that does the flashing program.

So, this program reads a BIN file (file read from the BIOS chip), gathers some data from there, then gets a CAP file (BIOS file downloaded from manufacturer's web) and inserts there these data. The resulting file is a BIN file ready to be programmed into the chip.

You'll get a lot of info in hardforum.com

FD44Editor.exe output for Left and Right Chip


Així doncs el xip esquerre és una BIOS de ASUS i correspon amb el que toca a la placa, i el xip de la dreta no conté una BIOS.


  • Assumeixo que el xip de l'esquerra està malament, i per tant, li copio els continguts del de la dreta. Resultat: La placa no fa res, i no fa beeps quan se li treuen les RAMs.
  • Descarrego una BIOS versió 1403 del fabricant (fitxer CAP), llegeixo les dades de la BIOS actual (fitxer BIN) i les introdueixo a la BIOS del fabricant amb FD44Editor. El fitxer resultant (BIN) el gravo als dos xips: Resultat:  La placa no fa res, i no fa beeps quan se li treuen les RAMs.
  • Descarrego la versió 0803, que és la que hi havia al xip, i procedeixo com al cas anterior. Resultat: La placa no fa res, i no fa beeps quan se li treuen les RAMs.
  • Recupero els backups als dos xips. La placa torna a fer el que feia al principi.
  • Intercanvio els xips: res: ni tan sols pita si trec les RAMs. Torno a posar els xips a lloc.
  • Programo la versió 1403 NOMÉS al xip de l'esquerra (el de la dreta manté ens continguts originals). BINGO! FUNCIONA!
Així doncs, sembla que els dos xips no han de contenir la mateixa informació.
So left chip is identified as a ASUS BIOS chip for my mainboard, and right chip is not.


  • I assume that right chip is corrupt and copy left chip contents to right chip. Result: it does nothing, and does not even beep when RAMs are removed.
  • I download a BIOS version 1403 from manufacturer (CAP file), I read some data from my current bios (BIN file) and insert them to the manufacturer's CAP file using FD44Editor. The resulting file (.BIN) is programmed to both chips. Result: Board does nothing, it does not even beep when RAMs are removed.
  • I download from manufacturers's support site BIOS version 0803, that was the one that I found in left chip. I repeat last operations (program both chips). Result: Board does nothing, it does not even beep when RAMs are removed.
  • I recover backups to both chips. Back to the beggining.
  • I swap chips left to right. Again nothing, and it does not beep when RAMs are removed. I return the chips to their original sockets.
  • I program version 1403 ONLY in LEFT CHIP (Right Chip keeps original contents). BINGO! WORKS!
Looks like both chips don't have same info.

dimarts, 28 de juny del 2016

Black Screen when updating Intel HD Drivers on Windows 10 computer. Pantalla negra en actualitzar controladors d'Intel HD en Windows 10

Problemes actualitzant el controlador de Intel HD 2500 Windows 10. Pantalla negra. Problems updating Intel HD 2500 driver Windows 10. Black Screen
Escenari:

Gigabyte GA H61M-D2H-USB3
Intel Core i3 3220
Windows 10 Home actualitzat des de Windows 7.


Problema:
Durant les actualitzacions automàtiques, Windows 10 instal.la un driver de Intel Graphics que emet el só de desconnexió del dispositiu i deixa de mostrar coses per la pantalla. Pantalla negra.

Passos per a arreglar-ho:


  1. Descarregar el controlador de gràfics Intel del per a la tercera generació de Intel Core.
  2. Configurar la pantalla a 1024x768
  3. Efectuar la instal.lació: pantalla negra.
  4. Apagar el PC i tornar a encendre
  5. Anar a l'administrador de dispositius.
  6. Desinstal.lar el controlador de pantalla.
  7. Reiniciar.
  8. El controlador nou s'instal.la i funciona.
  9. Configurar 1280x1024 o el que convingui.
  10. Windows Update ja no molesta.


Scenario:

Gigabyte GA H61M-D2H-USB3
Intel Core i3 3220
Windows 10 Home updated from Windows 7.

Problem:
During automatic updates, Windows 10 installs a Intel HD Graphics driver that makes a device disconnect sound and then the screen is turned off. Black Screen.

Steps to solve:


  1. Download the Intel graphics HD driver for 3rd generation Intel Core.
  2. Configure Screen 1024x768
  3. Install the driver: black screen.
  4. Unplug the PC and restart.
  5. Device Manager
  6. Uninstall Video Driver.
  7. Restart
  8. New driver is installed and works.
  9. Reconfig to 1280x1024 or preferred resolution.
  10. Windows Update does not bother.


dissabte, 27 de febrer del 2016

Suzuki GS500 Garmin 17mm ball mount for Suzuki GS500E


Fer l'anclatge per un GPS Garmin per a la GS500E model antic (amb semimanillars) és un joc de nens.

Només ha calgut aconseguir una bola d'acer inox de qualitat 304 i portar-lo a soldar al cargol de la tija del manillar.

El cargol és d'acer grau 6.6 i es deixa soldar bé.

La bola l'he comprat a http://www.bearingoptions.co.uk/ És important no comprar una bola de coixinet perquè son reforçades i no se solden bé.

L'he portar a soldar a mecàniques Casmar: http://www.casmarpal.com/


Building DIY a Garmin Nüvi mount for the old GS500 (with clip ons) is very easy:

You'll need a 17mm stainless steel ball grade 304 and weld it to the steering stem bolt.

Bolt is steel grade 6.6 and can be welded to stainless steel.

I got the 17mm ball at http://www.bearingoptions.co.uk/. Don't use ball bearing balls because they are hardened and will not weld.

I got it welded at Mecàniques Casmar: http://www.casmarpal.com/


Wiring / Cablejat _______________________


Aquesta part també és fàcil: he comprat un transformador conmutat de 12V a 5V 2A amb endoll impermeable.
Ho trobareu a eBay.
This part is also quite easy: I got a USB power converter 5V 2A with waterproof plug.
Ebay is your friend.


Dins del faro es pot posar la capseta. L'he enganxat amb cinta de doble cara.

Jo he agafat els 12V dels fastons del portalàmpares del llum de posició.
Marró = 12V. Blanc/Negre=negatiu.

I placed the power supply inside the headlight housing. I glued it with double-side tape.

Got 12V from the fastons for the side light lamp holder: Brown=+12V White-Black = Ground.


Després només ha calgut trobar un encaix on posar el connector USB. Ha sigut senzill muntar-lo en l'espai que queda entre el manillar i la bomba de frè. Then I found a safe place to glue the usb waterproof connector: between the handlebar and the brake pump.


Result:


Yamaha Tenere 660 3YF Garmin GPS 17mm ball mount.

Ja fa un temps que volia muntar un GPS Garmin Nüvi a la Tenere 660 del '97.

Com que cap dels anclatges que existeixen em feia el pes, i a més a més eren molt cars, he decidit fer-me'n un.


It was about time that I put my hands on building this Garmin Nüvi 17mm ball assembly for my '96 Yamaha Tenere XTZ660

I don't like the bike assemblies I've seen for this model so I made one DIY.


Wiring / Cablejat____________________________


He comprat un connector d'encenedor i adaptador de USB de 5V 2A per a manillar de moto.
L'he comprat a ebay i prometen que és impermeable.
I purchased a cigarette lighter connector with USB 5V 2A power supply for motorcycle handlebar .
I got it from ebay. I can read "waterproof" in the description...


Els 12V els trec de la bocina: un dels terminals (Marrón) és el 12V des del regulador. El negatiu directament connectat a xassís: l'he tret del cargol que aguanta la bocina.

No m'agraden els "robacorrents" perquè foraden l'aïllament del cable, prefereixo els faston derivadors, que es poden muntar directament als terminals de la bocina per a treure'n 12v. A més a més és de fàcil desmuntar si hi ha problemes i no deixa rastre.

12V is taken from the brown wire at the Horn (+12V from regulator). Negative is Ground (frame) taken from the horn screw.

I don't like cable clip splitters because they harm wiring isolator. I prefer faston splitters. They can be easily placed at the horn terminal and they can be easily removed of something happens.


I don't like clip splitters.
No m'agraden els robacorrents.

Faston splitter.
Easy to plug to the horn terminals.
Fàcil de connectar al terminal de la bocina.


M6 terminal.
To connect frame GND
Per a connectar el negatiu al xassís.


Wiring: Cablejat:


Garmin 17mm ball Assembly / Anclatge de Garmin bola de 17mm ___________________________________________


He comprat una bola d'acer 304 (acer inox alimentari) de 17mm i l'he portat a soldar amb inox a una femella M8 d'acer inox A2.

És important no fer servir boles de coixinet perquè estan reforçades i no se solden bé. Jo l'he comprada a http://www.bearingoptions.co.uk/

Me l'han soldat a Mecàniques Casmar. http://www.casmarpal.com/

Després he construït un espàrrec inox M8 que pot ser de 75 a 85mm de llarg, li he muntat una femella autoblocant i l'he muntat al manillar. Veure foto.

I got a 17mm stainless steel ball grade 304 and welded it to a M8 stainless steel A2 nut

Don't use ball bearing balls since they are hardened and they are difficult to weld.
I purchased the balls at http://www.bearingoptions.co.uk/
I got them welded at http://www.casmarpal.com/

Then I cut a stainless steel M8 screw at a length of 75 to 85mm. Inserted a locking nut and installed it in the handlebar mount. See photo.

Result: 


divendres, 29 de gener del 2016

Nitsuko PB4500 serial printer DB25M to RJ45 Cable


Molts productes es queden sense suport dins del període de vida útil. En alguns casos alguns aparells poden tenir una vida molt llarga si estan ben fabricats i no estan dissenyats amb obsolescència programada. Forçar a l'usuari final al canvi és obligar-lo a refer procediments que ja té establerts i fixats en la seva rutina, i que no té cap necessitat de canviar si no és per l'interès del fabricant de fer-li comprar un producte nou que reemplaci el vell per a fer el mateix.

Alguns d'aquests aparells son per exemple els terminals punt de venda.

Ens trobem amb un TPV Nitsuko PB4500-0700 que se li ha trencat un cable d'impressora. El proveïdor no troba recanvi ni suport i ens demana canviar tot l'equip i la impressora.

La impressora és interface sèrie i el TPV porta un connector RJ45 per a connectar-la.

Solucionar aquest problema és senzill comprant un cable de xarxa comú i un connector DB25Mascle.

Tallarem el cable de xarxa per la meitat i els cables interns els soldarem al connector DB25mascle.

COMPTE! que m'he trobat amb connectors DB25m amb els números de Pin al revés
Lots of products run out of support while still under their lifetime use. Some of them may get a very long life if they were built using quality components and not designed to fail under a planned obsolescence.

End user is forced to replace the appliance, thus replacing the usage procedures that he is used to, not to suit or take advantage any new requirements, but to give the manufacturer some sales.

For example Programmable Point of Sales equipment.

In this case we have a Nitsuko PB4500-0700 POS terminal with a broken printer cable. Solutions provider can't find a spare cable nor any support from Nec/Nitsuko so he issued an invoice for a new POS and terminal.

Printer interface is serial and the Nitsuko has a RJ45 plug to connect the printer.

Solving this issue is easy: we will need a standard network cable and a DB25M connector.

We'll need to cut the network cable and solder the wires to the DB25M with next pinout.

BEWARE! I found some chinese DB25M with wrong pin numbering!


Pin numbering as seen from ths pins side, not solder side. 
Numeració dels pins vista des del costat dels pins, no el de les soldadures.


Wiring:


 RJ45 Pin #              DB25M pin # 
       3 Green-White-------3 
       4 Blue--------------2 
       7 White-Brown-------7 (GND)
       6 Green---------.---6  DSR
                       `---20 DTR


  • The pin 6-to-20 bridge in DB25 is used to bypass the hardware flow control based on DSR-DTR terminals.
  • CTS-RTS flow control is not used
  • Pin 7 is GND
  • Pins RX and TX are the remaining pins.