| Sembla ser que els teclats dels ordinadors Jumper (també sota les marques Injoo, Vexia, i Primux) de la serie EZBook tenen certa propensió a trencar-se. Son equips de procedència xinesa i d'un mercat molt econòmic, això es nota en les seves poques capacitats per a poder ser reparats. El principal problema és que el propi teclat conté la tecla de posta en marxa de l'ordinador, per tant, quan falla el teclat, l'ordinador no s'engega. No obstant, jugant una mica amb el flex del teclat, fent alguna mena de contacte, s'aconsegueix que l'ordinador s'engegi i amb un teclat usb extern es por fer servir, i comprovar que funciona. Per tant, la reparació necessària és tan sols del teclat. Vejam com es repara: |
Looks like Jumper EZbook keyboards are prone to failure (Jumper brand is also found under Injoo, Vexia and Primux brands). These are chinese computers aimed to the cheap consumer. Don't expect them to be easily repairable. Main issue is that the keyboard contains the power on button. Hence, you can't power on when you have a keyboard issue. Messing with the flex inside the connector you can manage to start the computer and see that nothing else is affected. You can use a usb keyboard to use the computer. So, the required repair is only the keyboard. Let's see how to repair Jumper EZbook: |
1: Open back cover and remove mainboard
| Desfer els connectors de la bateria, LCD, teclat, touchpad, plaqueta de USB i auriculars i desoldar els cables dels altaveus i del micròfon. |
Unfasten battery connectors, LCD, keyboard, touchpad, usb+headphones assembly, and unsolder the speaker and microphone cables. |
| Desmuntar la plaqueta del usb i auriculars, desenganxar la bateria, que està enganxada amb cinta adhesiva i desmuntar tota l'assembly de la pantalla. |
Remove the usb+headphones assembly, remove battery (adhesive tape) and remove the whole screen+hinges assembly |
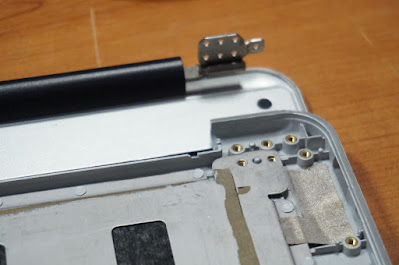
| Aquesta és la part dificil: el teclat no està fet per a ser desmuntat: està dins d'una tapa metàl.lica que està muntada i soldada amb plastic fos, a la carcassa de l'ordinador. Per tant, caldrà trencar tots els punts de soldadura, i després refer-los amb cola epoxi. |
This is the difficult part: keyboard is not meant to be repairable. It is inside a metal cover that is soldered, through melted plastic supports, to the plastic notebook palmrest cover. Hence, we will need to crack all these solders, and redo later with epoxi. |
4: Install replacement keyboard
| Hi ha dues versions d'aquest ordinador. Es diferencien per el tamany de la tecla que hi ha sobre l'enter. En el meu cas és la versió que a Aliexpress anomenen com a "new version". Cal dir, que aquest és un Ezbook 2 amb un processador x5-z8300, i que és identificat en molts casos com un "primera edició". El recanvi que cal comprar és el que s'indica al flex del teclat. En el meu cas posava MB3002003US Durant la col.locació, cal refer els punts de soldadura 1) Superglue (cianoacrilat). Una petita gota de cola penetrant farà soldadura a la part que no és accessible. Posar-ne molt poca! Esperar 30 min per secar. 2) Araldit (epoxy). una gota gens penetrant, farà de soldadura per la part posterior. Deixar secar 2 hores. Seria més senzill si ho haguessin fet amb cargolets, enlloc de soldadures de plàstic. |
There are several versions of this computer. You can see the key over the enter key, that sometimes is larger that other. In my case, Aliexpress said this is the "new version" My Ezbook 2 has a x5-z8300 and is the new version. Not to be confused with the x5-z8350. The final word is the part number shown in the keyboard flex: mine is: MB3002003US New parts will need to be "resoldered" using glue: 1) Use Superglue (cianoacrilate). A VERY SMALL amount of superglue, being very penetrating glue, will help to attach the keyboard to the cover. Wait 30 minutes to allow for curation. 2) Use Araldit (2 component epoxy) not very penetrating to redo the solder points at the back. Allow 2 hours to cure (read glue manufacturer manual) It would be probably easier if they used screws instead of melting plastic. |
Superglue penetrating glue. Very small amount.
2-component epoxy to create a solder point.
Solder points done. Waiting for curation.
Install cover, place a weight on the cover.
Dell heavy computing :-)
Again: a small drop of superglue to attach the inner part of the cover.
2-component epoxy to recover the solder point.
5: Reassemble
| Una vegada esperat el temps requerit pel fabricant de la cola epoxy, ja es pot muntar l'ordinador. |
Once the epoxy glue is cured (see glue manufacturer manual), we can reassemble the computer. |
Palmrest recovered with a new keyboard.
Make sure this metallic adhesive tape is well attached to the cover. Nobody wants a short in the mainboard.
Resolder the speakers cables and the microphone.
Reattach the battery to the keyboard cover using new strong adhesive tape.
Reinstall LCD assembly and refasten all the flex cables. Finish with the battery connector.
EZBook 2 model 464 recovered!
| Un altre aparell que ha deixat de ser residu electrònic per a tornar a fer servei. Materials i eines: - Tornavis miniatura i palanca d'obrir carcasses de plàstic. - Soldador electrònic i fil d'estany - Cutter - Superglue (cianoacrilat) - Araldit (epoxy) - Cinta americana per aguantar la bateria |
Another electronic device that will be saved from electronic waste. Materials and tools: - miniature philips screwdriver and plastic pry tool - Electric solder and tin/lead solder wire - Cutter (precision knife) - Superglue (cianoacrilate) - 2-component epoxy - strong adhesive tape to attach the battery. |


