divendres, 17 de setembre del 2021

 Rapoo slim Keyboard repair.

Rapoo Keyboards are known to be unrepairable, because electronics housing is only reachable through keyboard membrane foil removal, but this is not possible since it is super-glued to the metal sheet. People that attempted this repair reported total destruction. Simply pry the cover out by breaking the screw threads. Then you will be able to repair the electronics. Rapoo keyboards are known to have very weak solder points in the charge connector. Be gentle when plugging/unpluging. I am very fond of Rapoo keyboards because they have the keys where they are expected to be, for a programmer: including that rare shaped enter key that you find in european keyboards, the small left shift that allows for the 103 key, the reasonable Fn alternative functions in arrow keys and function keys, and the Break key, the PrtScr, are all there. Even Dell and HP laptop keyboards fail some of these, and this is extremely annoying for pro use.

Video:


diumenge, 4 d’abril del 2021

ZHIYU 1X3L fan speed controller manual

 ZHIYU 1X3L fan speed controller manual


Els fabricants xinesos fan petites meravelles, però no disposen d'un manual que pugui facilitar l'ús.

Una autèntica llàstima.

Doncs l'he fet jo. No és la primera vegada que ho faig.


 Chinese manufacturers build some electronic PCBs that are a gem, but the lack of a manual make them very difficult to use.

A true pity.

Ok, I wrote a manual. It's not been the first time.


 ZHIYU 1X3L fan speed controller és un controlador de velocitat de ventiladors de 3 pins, amb sensor de temperatura.

S'hi poden configurar els següents punts:
  • Velocitat base del ventilador
  • Temperatura a la que comença a incrementar la velocitat
  • Temperatura a la que el ventilador anirà al màxim de velocitat

La velocitat màxima del ventilador no es pot configurar, donce vé donada per la velocitat del ventilador a 12V
 ZHIYU 1X3L fan speed controller is a fully configureable 3-pin fan speed controller, with temperature sensor.

These points are configureable:
  • Fan base speed
  • Temperature where fan speed starts to rise.
  • Top temperature where fan will be top speed.
Top fan speed is not configureable, since it will be fan's speed when powered at 12V.


 La configuració es porta a terme amb 1 unic botó, i 3 leds que tenen diversos significats.

Botó:
  • Pulsacions curtes i llargues
  • Pulsacions i dobles pulsacions
LED :
  • Led central fix, intermitent lent i intermitent ràpid
  • Leds laterals per indicar setting de les taules.

 Configuration is done using a single button and 3 leds with several meanings:

Button:
  • Short press and long press action
  • Single press and double click press.
LED
  • Middle led is steady, blinking slow or blinking fast
  • Side leds indicate setting

Manual:


Based on this excellent video: https://youtu.be/NBcCFYZhU_0

Please note that the Video will cover the "hidden feature" where the fan can be configured to remain off while temp is under "base temp speed".

Chinese american 104 key keyboard in 105 keyboard countries: key replacement using sharpkeys.

 Chinese american 104 key keyboard in 105 key keyboard countries: key replacement using sharpkeys.


 Els teclats americans son de 104 tecles, mentre que la pràctica totalitat dels teclats dels paisos europeus son de 105 tecles, n'hi ha que més i tot.

Si es compra un portàtil de renting, habitualment son amb teclats europeus, i amb alguns adhesius es pot solucionar, tot i que la forma d'algunes tecles (com l'enter) a vegades no és la que toca.

Si es compra un portàtil xinès, tots venen amb teclat americà (104 tecles) i es perden funcionalitats importants, com per exemple els símbols "<" i ">"

El cas que fa més mal és el del fabricant de tablets CUBE, que fa un teclat de 105 tecles amb un tacte millor que excel.lent, però una de les tecles s'assigna a fer sortir la cadena ".com", i no es pot redefinir per a fer sortir els símbols de la tecla que falta.
 American keyboards are 104 key, while about all european keyboards are 105-key. Some have even more.

When purchasing an ex-corporate used equipment, chances are that they are from european companies, so they are 105-key, and using them in Catalonia will only require some Spanish keyboard labels to attach to keys. Some keys may have different shape (enter), but it's a small issue.

But purchasing a chinese computer is a trouble, since they are 104-key american keyboards, and we will lack some important key, for example the "<" and ">" symbols.

The saddest one is found in CUBE tablet manufacturer, that builds a beyond-than-excellent keyboard with 105 keys, but one is dedicated to write the string ".com", and it is not redefinable.


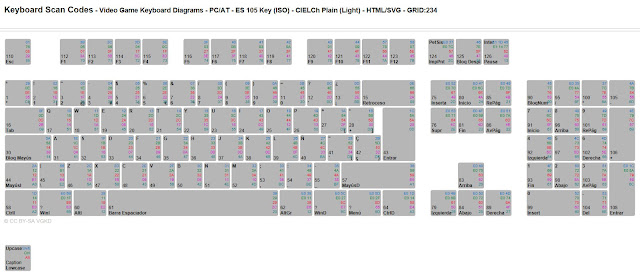
Spanish 105 key keyboard


American ANSI 104 key keyboard with the keys that cause much trouble. Note that the enter key is different shape, hence, the "ç" is relocated, but the most important issue is that the "<" and ">" key is MISSING. How can I program, or mail, without this key?? Chinese manufacturers, can you see the problem?


Here we are the chinese Jumper ezBook 2 is missing the ">" "<" key


Workarounds I could see in other chinese keyboards: using the FN key


The saddest one: Cube chinese manufacturer, having developed an excellent 105 key keyboard, they use one key to produce the ".com" string, converting it to a 104 key keyboard. Cube, please!


There's a program here to help: Sharpkeys


 El programa sharpkeys, transforma una tecla en una altra. De fet, ho fa el propi windows, a través d'una clau de registre. El que fa el programa sharpkeys, és facilitar escriure aquesta clau de registre.

La idea és agafar una tecla que es faci servir poc, com és la del menú contextual de windows, i convertir-a en la tecla que falta "<" i ">".

Passos:

1: Buscar els Scan Codes de la tecla reemplaçada

2: Buscar els Scan Codes de la tecla a reemplaçar

3: Configurar-ho a Sharpkeys

4: Demanar a sharpkeys que posi la clau de registre

5: reiniciar.
 Sharpkeys program allows to convert a key into another. In fact, it is windows, that does the job, but sharpkeys helps you to write the registry key that does the magic.

We will replace a key that has few use, for the key we are interested. For example: the windows context menú key by the "<" and ">" key.

Steps:

1: Lookup the Scan Codes for the replaced key

2: Lookup the Scan Codes for the replacement key

3: Configure it in sharpkeys

4: Click the "Write to Registry" key to allow sharpkeys do the job

5: restart


Step 1 and 2 Scan Codes:

Find them in this excellent web: http://isometricland.net/keyboard/keyboard-list.php
Scroll down to "Keyboard Scan Codes".


I'll replace the "E0 5D" key (Menú) with the "00 56 Special ISO extra key" that will generate the "<" and ">" symbols that I'm missing, since my american ansi keyboard does not have the key there. (Not to be confused with E0 56)


Step 3: Sharpkeys configuration

Download here: https://www.randyrants.com/category/sharpkeys/


Add a key remapping:


Step 4 and 5: Write to registry and reboot.


Enjoy the new "<" and ">" key in the place of the context menú useless key.
A sticker ends the job.


dissabte, 20 de març del 2021

Jumper EZBook 2 model 464 keyboard repair


 Sembla ser que els teclats dels ordinadors Jumper (també sota les marques Injoo, Vexia, i Primux) de la serie EZBook tenen certa propensió a trencar-se.

Son equips de procedència xinesa i d'un mercat molt econòmic, això es nota en les seves poques capacitats per a poder ser reparats.

El principal problema és que el propi teclat conté la tecla de posta en marxa de l'ordinador, per tant, quan falla el teclat, l'ordinador no s'engega. No obstant, jugant una mica amb el flex del teclat, fent alguna mena de contacte, s'aconsegueix que l'ordinador s'engegi i amb un teclat usb extern es por fer servir, i comprovar que funciona.

Per tant, la reparació necessària és tan sols del teclat.

Vejam com es repara:


 Looks like Jumper EZbook keyboards are prone to failure (Jumper brand is also found under Injoo, Vexia and Primux brands).

These are chinese computers aimed to the cheap consumer. Don't expect them to be easily repairable.

Main issue is that the keyboard contains the power on button. Hence, you can't power on when you have a keyboard issue. Messing with the flex inside the connector you can manage to start the computer and see that nothing else is affected. You can use a usb keyboard to use the computer.

So, the required repair is only the keyboard.

Let's see how to repair Jumper EZbook:


1: Open back cover and remove mainboard


 Desfer els connectors de la bateria, LCD, teclat, touchpad, plaqueta de USB i auriculars i desoldar els cables dels altaveus i del micròfon.

 Unfasten battery connectors, LCD, keyboard, touchpad, usb+headphones assembly, and unsolder the speaker and microphone cables.


2: Remove LCD and battery.


 Desmuntar la plaqueta del usb i auriculars, desenganxar la bateria, que està enganxada amb cinta adhesiva i desmuntar tota l'assembly de la pantalla.


 Remove the usb+headphones assembly, remove battery (adhesive tape) and remove the whole screen+hinges assembly


3: Remove the keyboard cover and the keyboard assembly


 Aquesta és la part dificil: el teclat no està fet per a ser desmuntat: està dins d'una tapa metàl.lica que està muntada i soldada amb plastic fos, a la carcassa de l'ordinador.

Per tant, caldrà trencar tots els punts de soldadura, i després refer-los amb cola epoxi.
 This is the difficult part: keyboard is not meant to be repairable. It is inside a metal cover that is soldered, through melted plastic supports, to the plastic notebook palmrest cover.

Hence, we will need to crack all these solders, and redo later with epoxi.


4: Install replacement keyboard


 Hi ha dues versions d'aquest ordinador. Es diferencien per el tamany de la tecla que hi ha sobre l'enter. En el meu cas és la versió que a Aliexpress anomenen com a "new version".

Cal dir, que aquest és un Ezbook 2 amb un processador x5-z8300, i que és identificat en molts casos com un "primera edició".

El recanvi que cal comprar és el que s'indica al flex del teclat. En el meu cas posava MB3002003US

Durant la col.locació, cal refer els punts de soldadura

1) Superglue (cianoacrilat). Una petita gota de cola penetrant farà soldadura a la part que no és accessible. Posar-ne molt poca! Esperar 30 min per secar.

2) Araldit (epoxy). una gota gens penetrant, farà de soldadura per la part posterior. Deixar secar 2 hores.

Seria més senzill si ho haguessin fet amb cargolets, enlloc de soldadures de plàstic.
 There are several versions of this computer. You can see the key over the enter key, that sometimes is larger that other. In my case, Aliexpress said this is the "new version"

My Ezbook 2 has a x5-z8300 and is the new version. Not to be confused with the x5-z8350.

The final word is the part number shown in the keyboard flex: mine is: MB3002003US

New parts will need to be "resoldered" using glue:

1) Use Superglue (cianoacrilate). A VERY SMALL amount of superglue, being very penetrating glue, will help to attach the keyboard to the cover. Wait 30 minutes to allow for curation.

2) Use Araldit (2 component epoxy) not very penetrating to redo the solder points at the back. Allow 2 hours to cure (read glue manufacturer manual)

It would be probably easier if they used screws instead of melting plastic.


Superglue penetrating glue. Very small amount.

2-component epoxy to create a solder point.

Solder points done. Waiting for curation.

Install cover, place a weight on the cover. 
Dell heavy computing :-)

Again: a small drop of superglue to attach the inner part of the cover.

2-component epoxy to recover the solder point.


5: Reassemble


 Una vegada esperat el temps requerit pel fabricant de la cola epoxy, ja es pot muntar l'ordinador.

 Once the epoxy glue is cured (see glue manufacturer manual), we can reassemble the computer.


Palmrest recovered with a new keyboard.

Make sure this metallic adhesive tape is well attached to the cover. Nobody wants a short in the mainboard.

Resolder the speakers cables and the microphone.

Reattach the battery to the keyboard cover using new strong adhesive tape.

Reinstall LCD assembly and refasten all the flex cables. Finish with the battery connector.

EZBook 2 model 464 recovered!


 Un altre aparell que ha deixat de ser residu electrònic per a tornar a fer servei.


Materials i eines:

- Tornavis miniatura i palanca d'obrir carcasses de plàstic.
- Soldador electrònic i fil d'estany
- Cutter
- Superglue (cianoacrilat)
- Araldit (epoxy)
- Cinta americana per aguantar la bateria

 Another electronic device that will be saved from electronic waste. 


Materials and tools:

- miniature philips screwdriver and plastic pry tool
- Electric solder and tin/lead solder wire
- Cutter (precision knife)
- Superglue (cianoacrilate)
- 2-component epoxy
- strong adhesive tape to attach the battery.


diumenge, 10 de gener del 2021

Dell Latitude E7240 touch panel with bubbles, stains and leaky gummy. Replacement.


 Dell Latitude E7240 touch panel with bubbles, stains and leaky gummy. Replacement.


Tots els que ens guanyem la vida amb la informàtica solem tenir un bon arsenal d'equips. En aquest cas tinc un parell de Dell Latitude E7240 Touch, que son un parell de ultrabooks de 12 polzades amb pantalla d'alta definició, que permet fer feines de camp de forma excel.lent, tant en windows com en linux.

D'un dia per l'altre van començar a sortir bombolles d'aire sota la pantalla, i va durar un parell d'anys, que les bombolles van anar augmentant. Recentment, les bombolles es van fer molt grans, va començar a sortir un liquid molt enganxós per sota la pantalla, i el panell reflector de llum es va tacar amb unes ombres molt lletges.

Vaig pensar que s'havien aixafat, en les dues motxilles que tinc. Però amb el temps vaig comprovar que hi havia molta gent, a Internet, amb aquest problema. El cas és que la cola de sota del panell tàctil es degrada, es torna líquida, i suqueja per sota la pantalla i penetra dins del panell de cristall líquid, tacant les fulles reflectores.

Dell no va ser de gran ajuda. Els vaig contactar i em van dir que els donés els Tags. Van dir que no estava en garantia i em van convidar a fer una enquesta. No els vaig deixar gaire bé, doncs el Dell 6230 que havia tingut abans ja havia tingut algun problema de degradació del reposamunyeques, que estava revestit d'aquella goma que acaba tornant-se enganxosa.

Igual que l'altra vegada, Aliexpress sol ser de més ajuda: vaig encarregar el recanvi i el vaig instal.lar a casa.

Every IT pro use to have a good collection of computer gear at home.

I have a couple of Dell Latitude E7240 touch. They are ultrabook class devices, that having only 12 inch LCDs but offering FullHD resolution, a decent battery life for the weight, a processor that allows for virtualization, and a wired network interface, make them excellent for field operation using either windows or linux.

Some time ago I noticed some air bubbles under the touch panel. They were like this during 2 years. All of sudden, the bubbles grew, and some gummy thing started to leak under the LCD panel. The backlight reflector got stained and very ugly shades appeared.

I thought that the computers were damaged during storage. I may have crushed them. But searching the internet I could see that there were a good bunch of people complaining about the issue. Looks like the glue under the Touch panel gets degraded, turns liquid, and leaks some sticky thing to lcd clamshell, and into the LCD backlight reflection sheets.

Dell was of no help. I contacted, asked the service tags and confirmed that they were out of warranty. They sent me to an online survey about product quality. Since I was also victim of the Dell E6230 palmrest gummy rubber paint, I complained a lot. Dell has some serious problems with materials.

Aliexpress came handy again: I ordered the spare parts and instaled by myself.


Dell Latitude E7240 touch panel with bubbles under the panel.


Dell Latitude E7240 touch panel with stained backlight


El problema és que el panell LCD no porta cargols: és una carcassa on les dues meitats van enganxades.

Cal utilitzar eines per obrir carcasses de plàstic.
The problem is that the LCD is inside a clamshell that has no screws. Two halves are glued together.

We will need tools for plastic pry and open.


Tools required. Plastic Pry tools and contact glue. The best one is the green.


Per partir la carcassa, començar punxant.To crack open the clamshell start tu pry between the halves.


Work the tool along the crack to break the glue.


Anar desllissant l'eina per l'esquerda, acaba trencant la goma que les uneix.


Working the tools in the crack, glue gets broken and you can open the halves.


Work the tools along the crack to break the glue.


Cal anar amb compte amb els diferents elements a l'interior: tots han de quedar enganxats a la tapa de fora. La cola és prou forta com per a causar desperfectes.Take care with the different devices inside. All these must remain attached to the outer cover. Glue is so strong that may break some devices.


Take care with internal devices. They must keep attached tot he outer cover
Glue is so strong that may cause some device damage. See image.
Use a long tool to work the lower part of the LCD assembly.


LCD Assembly internals. There are three antenna devices plus the camera.
I damaged one of these.


Hopefully, it is only a cover that could be installed again. Nothing serious.


Here we can see a leak of the sticky thing.


Aliexpress serveix el recanvi com a LCD o com a LCD amb el marc.
Evidentment és molt més fàcil fer la feina, si es compra el recanvi amb el marc ja enganxat.
Aliexpress offers the LCD and the LCD with bezel.

The job is much easier, using the LCD+Bezel spare part


Aliexpress Spare part: You better purchase the LCD+Bezel. There's also offered the LCD only option.


For those willing to know about the part numbers:
LP125WF1 (SP)(A4) manufactured by LG Display
D/PN:0PY6P2 (older damaged)
D/PN:05CXGG (aliexpress replacement)


Per desconnectar El LCD cal arrencar in celofan i desencaixar un "seguro" que Porta El connectorLCD connector is secured through an adhesive strap and a latch in the connector


Connectem la pantalla de repost per a veure si funciona tot correcteSimply connect the replacement screen and check if everything is OK


Replacement LCD connected to check if everything's fine.


Abans d'encolar les pieces convé netejar les restes de l'anterior. Fer servir un troç de roba i alcohol. Ningú vol tenir problemes d'enganxament, no?Before glueing the lcd covers again, it is mandatory to clean the matching surfaces. Use a cloth rag and alcohol. Nobody wants a glue failure.


He provat de fer servir una cinta adhesiva de double cara per tornar a enganxar la carcasses, però no ha funcionat.

Provaré cola de contacte, que sembla que pot ser el que millor funcionarà. Quan vaig desmuntar-ho, semblava cola de contacte.
I tried to use double sided adhesive tape, but the results were not good.

I'll use contact glue. I think it will do the job. After all, when I unglued the clamshell, the glue I removed was like contact glue.


Used contact glue.


Seguiu les instruccions del fabricant de la cola:
1: Escolar
2: Ajuntar
3: Separar per endurir 1min.
4: Ajuntar i mantenir pressionat 24h 
Follow the glue manufacturer's instructions to use.
1: Apply glue
2: Join both halves
3: Split again and let it cure 1min.
4: Close both halves and apply pressure for 24h


Glue cure procedure


Pressure for 24h


Després de 24h, la carcassa ha quedat perfectament tancada i resistent. After 24h, LCD assembly is propperly closed and strong.


Finishing is near perfect.


YAY! Dell Latitude E7240 ready to use again!